Thread tension making you...tense?
- Rachel Bunney

- Feb 6
- 7 min read
If you sew - whether that’s with a sewing machine, embroidery machine, overlocker or even by hand - thread tension is one of those topics that can quickly turn excitement into frustration.
But tension doesn’t have to be mysterious or intimidating. Once you understand what’s actually happening inside your machine, it becomes much easier to spot problems, fix them quickly, and get back to enjoying your sewing or embroidery.
In this post, I’m going to focus mainly on machine embroidery tension - what it is, how it works, how to check whether yours is set correctly and how to put it right if it's not.
Let's start at the beginning...
What is tension?
Put simply, tension is the balance between the top thread and the bobbin thread. When that balance is right on a sewing machine, the stitches lock neatly inside the fabric with the same amount of thread on the top and back of the fabric. When it’s off, you might see more thread on either side of the fabric, thread loops, fabric puckering, thread breaks or messy stitching.
Both top thread and bobbin threads have their own tension settings. We'll start off by looking at the top thread...
Top thread tension
Tension discs (top thread)
At the top or on the front of your machine, there will be a set of tension discs. On some machines, the discs will be visible, on other machines they're not. You may just see a dial on the front of your machine.
Sewing and embroidery machines will have one set of tension discs, overlockers and coverstitch machine usually have between 3 - 5 sets of tension discs, depending on how many threads the machine has.
Think of these discs like two cymbals - they're either open (apart) or they're closed (together). Most machines allow you to open and close the tension discs by raising and lowering the presser foot. Other machines will need the thread to be pulled in-between the tension discs to ensure the thread is in the correct position.
It's really important that the top thread sits between these tension discs so that the tension can do its job properly.
The images below show the location of the tension discs on a Bernina 590, just above point 2.


Pre-tension (on some machines)
Some machines also have a pre-tension, which is usually located just before the main tension discs. On the Bernina 590, the pre-tension is at the back of the thread path as indicated below. The thread also needs to sit inside this pre-tension to make sure the machine stitches well.
The first image shows the green thread still visible at the pre-tension stage. This may result in poor stitching and thread jams. To thread correctly, pull a little on the top thread to make sure it sits down in to the pre-tension.
The second image shows the green thread just visible in the channel, but it is no longer sitting at the top of the pre-tension.


Take up lever covers (on some machines)
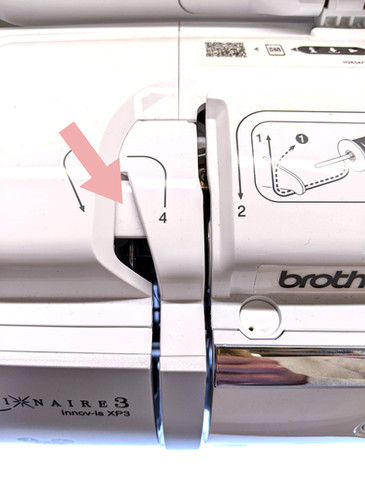
Some machines help you avoid tension issues before they even start stitching. Machines with take up lever covers indicate when the presser foot is lowered (so the tension discs are closed). This acts as a great reminder when threading up as the cover stops the user from threading up and prompts them to raise the presser foot.
The first image shows the cover in place (presser foot is lowered). The second image shows the cover removed (presser foot is raised). Both images are of a Brother Luminaire XP3.


Most common causes of tension problems
The most common cause of tension concerns is the machine not being threaded up correctly, and it's the first place I start when putting things right too. So before you start tweaking tension settings, check these things...
Raise the presser foot
Before you thread your top thread, make sure that the presser foot is raised. As mentioned earlier, if the presser foot is lowered, the tension discs will be closed and the thread won't have the correct tension.
This usually results in birds nesting underneath the fabric.
Use the foot raise button on your machine, or the manual foot raise lever (usually at the back or the side of the machine) to make sure the presser foot is in the upright position.


Raise the needle
Also make sure the needle is in its highest position. Doing this raises the take up lever and then the thread can sit inside it properly.
Check the needle position by pressing the needle up/down button on your machine, or turning your hand wheel until the needle is in the highest position.


Once the presser foot and needle are raised, the top thread can be threaded.
Check your machine manual for machine-specific help if needed.
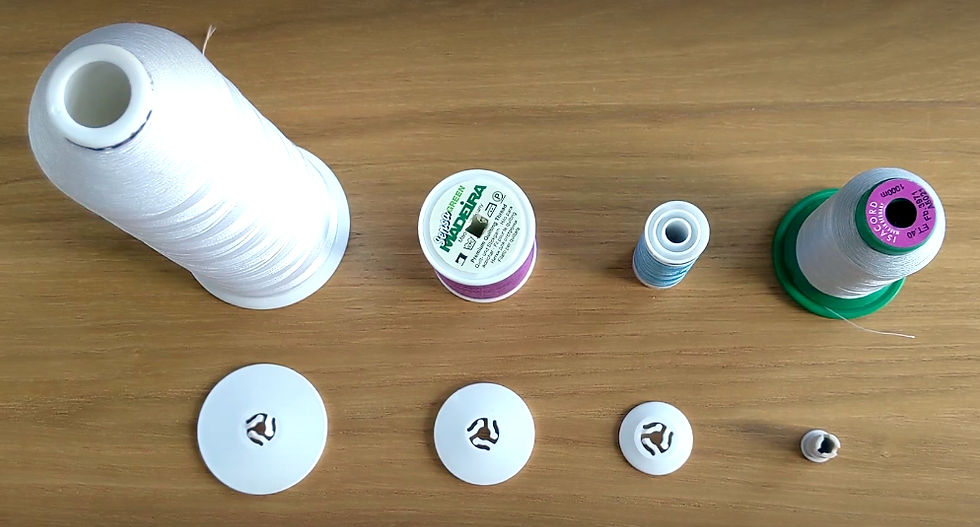
Check spool cap size
This is a small detail, but it can make a surprisingly big difference - especially on embroidery machines running at high speed.
There are many different types and sizes of spool cap. The one to use will depend on the size and type of the spool of thread you are using.
Ideally, you want to match the spool cap size to the spool size as much as possible. Don't use a large spool cap if you're using a tiny spool as this will give the thread some additional tension which could throw the thread balance off.
Bobbin thread tension
Now for the bobbin. The bobbin has its own separate tension which is on the bobbin case itself, however, bobbin tension rarely needs adjusting, unless something is wrong or you're stitching a specialist technique.
The main issues that occur with bobbin thread tension is that the bobbin hasn't been threaded correctly. Check your machine manual to make sure you're putting the bobbin in the correct way around.
Top loading bobbins (bobbins that go in the top of the machine) usually need to go into the bobbin case with the thread going around the bobbin anti-clockwise.
Check the thread direction and then drop the bobbin into the case. Put your finger on the bobbin as you pull the thread around the threading guide, to make sure the thread goes fully into the bobbin tension.


Front loading bobbins (bobbins that go in the front of the machine) usually go into the bobbin case the other way around, with the thread going around clockwise.
The image below shows the correct threading of a large Bernina bobbin. The silver markings need to go face down into the bobbin case and the thread then pulls around into the bobbin tension and into the cage.

Thread choices and tension
For normal sewing, you'd usually use the same thread on the top as you do in the bobbin. This helps to ensure that the balance of the top and bobbin threads are even and sitting perfectly on the fabric.
Machine embroidery is a little different as usually a different thread is used on the top to the thread in the bobbin. This difference is one of the reasons embroidery tension behaves differently to regular sewing.
Bobbin thread
The correct bobbin thread for machine embroidery is specifically made for this purpose. It's fine, lightweight and strong, making it great for high speed embroidery. Machine embroidery bobbin thread (or bobbin fill) is usually white or black and ranges from 60 - 120 wt depending on the brand of thread.
This works perfectly when the back of the embroidery isn't going to be visible. However, there are occasions when the same thread is used on the bobbin and as a top thread. For projects such as free-standing lace where the back is going to be shown, it's recommended to use the same thread top and bottom - matching the colours too.
This is only something that is suggested on these occasions, not all the time. Otherwise you'll be forever winding new bobbins with coloured thread, and using up your best embroidery threads for the back of the design.
Also, using a thread not designed to be used as a machine embroidery bobbin thread can result in poor tension and bulky stitching.
Top thread
There's more flexibility with top thread options. You still want to go for a machine embroidery thread but you can get different types, made from different fibres and they can give different effects.
Most commonly, machine embroidery top thread is made from polyester, but it is also available in rayon and other fibres such as Madeira's Sensa thread which is made from Lyocell.
Machine embroidery thread weights range from 30 - 75 (the higher the number, the lighter the thread).
How to check embroidery tension properly
The key to achieving perfect machine embroidery tension is to do a test. Stitch out a single letter using a satin stitch font - like a capital H - and check both sides for the results. We're looking for the 2/3 rule here.
On the back of the design, we want to see two thirds of top thread showing on the back, with one third of bobbin thread showing in the middle.
On the front of the design we can't see any bobbin thread at all.


If your embroidery meets the 2/3 rule, your tension is doing its job - even if it doesn’t look exactly like someone else’s sample.
If your test stitch doesn't meet the 2/3 rule then check the following:
Top thread - rethread, making sure the foot and needle are both raised before threading, and that the thread is sitting fully in the tension.
Bobbin thread - make sure the bobbin has been inserted the correct way around and that the thread is fully in the tension.
Check for any obstacles along the thread path such as the spool cap being too large or the thread catching around the spool pin.
If you have checked all this and you're still having issues, it's time to change the top thread tension. Make small adjustments only - tension changes should be gradual, not dramatic.
If your bobbin thread is showing on the top of the fabric, the top thread tension is too tight (or the bobbin thread is too loose). Loosen off the top thread tension by 1 and test again. Repeat if necessary.
If too much top thread is showing on the back of the fabric, the top thread is too loose (or the bobbin thread is too tight). Tighten the top thread by 1 and test again. Repeat if necessary.
Tension problems can feel overwhelming, especially with machine embroidery, but in most cases, the solution is simpler than it first appears. Correct threading, the right threads, and a quick test stitch will solve the majority of issues before you ever need to touch a tension setting.
If embroidery tension is something you regularly struggle with, it’s a topic we cover in The Digital Embroidery Foundation Course, along with a whole host of other machine embroidery topics, perfect for beginners.


Comments